I’ve decided that it’s Feathered Fairy Dress Wednesday today, so I’m giving you a selection of Fairy Dresses to add to your virtual wardrobe! So no complaining that you’ve got nothing to wear!
The bottom half of the dresses are made from dyed feathers and the bodices are all cut by hand using a selection of different coloured mirror cards.
So .. choose your dress, slip it on and we’ll all meet outside at 4pm today . . . then all we need is faith, trust and a little bit of Fairy Dust!
The backgrounds to the cards are all embossed – sadly the camera didn’t pick that detail up. (apologies for the photographs. I’m useless with a camera!)
Wishing you a bright, cheer filled, contented day! love ~
handmade by ~ Cobwebs ~ at The Cobweborium Emporium
I wanted to make something special, something with a bit of a ‘wow’ factor for an older friend who lives on the opposite side of the planet to where I am. It had to be big enough to be worthwhile making and receiving. But it had to be light enough so as not to cost such a huge amount for postage that I had to take out a second mortgage to pay for it! So I came up with the idea of a pot of flowers. However, it has a surprise twist to it. More about that ‘twist’ in a minute….
It took me lots of measuringand throwing sheet after sheet of copy paper into the bin (after using it to try out the measurements and see if they were right), before I found the correct measurements to make a card which was big enough to look like a plant pot containing flowers. Then I made the scalloped edge to the pot in order to give it another dimension. (You can just see the scalloped edge peeping out from below the flowers)
Then I made a stand for the back out of chipboard card, (so that the whole thing stood up just like a plant pot) and then blended some dark ink around the edges of the card to make it appear more rounded in shape – rather than the flat card it actually was.
Next came the flowers. The majority of the flowers are all handmade by me. However there are a handful of the smaller ready make paper/silk effect like flowers which kind of add an extra dimension and make it look more real in a funny sort of way.
…. and this is where the ‘twist’ comes in …
The card you’re looking at isn’t a single piece of card type card. This is a pocket card. The pot is sealed around three sides – and the top is left unsealed so that it makes a pocket, into which was going to be a tag.
So … now comes the tag part. I inserted the tag into the card so that I could work out how far down the tag I needed to put the flowers so that the tag couldn’t be distinguished from the card when it was in place and vice versa. But I didn’t want the brown of the card tag to show, so the flowers had to be in *just* the right place.
handmade by ~ Cobwebs ~ at The Cobweborium Emporium
When the tag is pulled from the pot of flowers I made sure that the pot was still pretty so was careful about where and how I placed the flowers. But the flowers you’re looking at aren’t the whole story. You see … I wanted the card to be just as pretty on the back as it was on the front … so the flowers go around the back of both the pot and the tag.
The tag was where I wrote my message to my friend and signed my name. I boxed the card and sent it via Royal Mail. The card arrived exactly one week later – and she was absolutely thrilled with it.
Oh heck .. I nearly forgot … the metal oxidised ‘copper’ label holder on the bottom of the tag actually isn’t metal at all. I die cut the label holder from a Sizzix die, then embossed it with copper embossing powder to which I’d added some green embossing powder in just the right colour … then I used the heat gun from below to melt the crystals, then once they’d melted, I swapped to heat from the top so that I could get a slightly bumpy, raised sort of look to it in a few places, so that it looked like it might be getting that kind of flaky thing going on. I then attached it to the card with glue, and used two copper brads (with the legs cut off) which I glued to either side of the label holder to make it look like it was screwed in place.
Hope you like it. Let me know by leaving a comment – I love your thoughts!
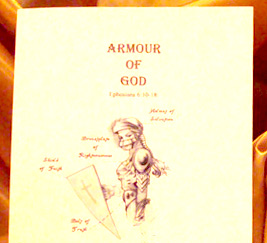
I made this pendant for a young relative who is religious and who has always like this type of steampunk style jewellery. She’s always been the one who stands out from the crowd, so I thought this combination of everything which speaks of her faith, combined with her love of the ‘alternative’ style of jewellery might just hit the spot.
tucked into the presentation box was this little book style leaflet which I put together, and which quotes the Apostle Paul’s letter to the Ephesians 6:10-18. For those of you who may have just glazed over … (lol) .. if you want to understand what I’m going on about then perhaps check out Wikipedia, and in its search bar just put ‘Armour of God’. It will take you where you need to be in order to read.
I didn’t want to start quoting biblical passages here as this isn’t a religious blog, it’s simply a post in my Craft blog, about an item of jewellery I’ve made, but it just happens to have a religious theme to the pendant. (But if you’re not in the least bit religious – it’s just a great Steampunk pendant!)
I have to admit that I’m fairly new to my Ranger Melting Pot (which I’ve christened The Cauldron). I bought it and then sat looking at it for several weeks, terrified of it. It seemed so ‘major’. Such a professional looking item which required someone with way more skill than I had. But … eventually I talked myself into getting the darn thing out on my desk and plugging it in. From that moment I was hooked. AND HOW!!
If you’ve never used one, then I highly recommend it. It’s the most fascinating, amazing, awe-inspiring bit of kit and you honestly don’t have to be a brain surgeon to get it working for you in the way you want it to work. I’ll be making a post about this machine in the ‘Products I Recommend‘ category on my blog, very soon. So if you are interested in possibly purchasing this bit of kit then check back and I’ll put together as comprehensive post about it as I can muster and get it up and ‘live’ by the end of this current week.
But .. back to the pendant: The necklace which it hangs from is made from a length of velvet ribbon in a rich warm green (it had a posh name for the colour, but my memory is rubbish so that name has gone by the by). I turned this length of ribbon into the necklace you see in the photograph by the addition of some jewellery ribbon ends – which are like little clamps with teeth which grip the ends of the ribbon so that it’s held firmly. I added some jump rings and then two lobster claw clasps. Voila – one necklace ready and waiting for a pendant.
The pendant: I did a rough sketch of what I had in mind and then set about making it. I chose the hobnailed bezel you see in the photograph and then searched through my stash for a cross which was the right shape and size to fit into that bezel. Once I’d found it, I then wanted to make it ‘glow’ in such a way that it showed clearly through the poured liquid which was to complete the pendant. So I used some Cosmic Shimmer glitter and flake Glue which I dabbed all over the cross, waited just a moment or two for it to get to a tacky stage and then covered the cross in a mix of silver, rose gold and yellow gold gilding flakes, so that it had a multi toned effect – but you couldn’t really see where one colour finished and the other began.
Then it was time to turn on the Melt Pot. (hears the notes to The Twilight Zone in the background)…. Into the CauldronMelt Pot I poured some clear Cosmic Shimmer Ultra Thick Embossing Crystals – not too much, but enough to make what I guessed was enough to fill up the bezel and then a little more, just to be on the safe side.
I added some inks – Cosmic Shimmer Melt Inks, … don’t use any other inks in your melt pot because other inks aren’t meant for the Ranger Melting Pot and if you get the wrong inks then the whole molten liquid can explode – you have been warned, – which, because I used CLEAR Ultra thick crystals, the inks simply coloured the clear [now] liquid in the melt pot. The colour remained transparent but the more ink you use, the deeper the colour gets. I then added a little pearl shimmer ultra thick crystals, which gave the liquid a look as if some sort of magic was happening somewhere in that mix.
I poured a small amount of the hot molten liquid into the triangle bezel and quick as I could, I then ‘set’ the cross into that tiny bit of liquid while it was still in its ‘un-set’ state. I needed to do this so that the cross was held in the place where I wanted it to be, so that it didn’t float around the bezel when I poured more liquid on the top. I gave it a moment or two to cool off and then I sprinkled some tiny specks of gold gilding flakes over the inside of the bezel and then carefully poured more of the molten liquid over the cross and carefully filled up the bezel to just the right level so that it was domed a little, but not so that it was close to over-flowing. All I had to do then was wait. Not long. Just wait a little while for the whole thing to cool down – which honestly doesn’t take long at all. Maximum ten/15 minutes for it to be totally cold.
And there you have it. One Steampunk pendant … or pendant with a religious theme (depending upon which way you want to look at it).
There is a little more to the Cauldron Ranger Melting Pot which you need to know if you’re going to invest in one. Either click to ‘follow’ me (that way you’ll get an email when I post something new on here) so that you won’t miss out on the post in ‘Products I Recommend’ which will be about the Melt Pot, or remember to keep popping back and checking my blog out so that you don’t miss it.
Made from Polymer Clay, each of those tiny little feathers you see, were individually made and attached to a heart shaped base which I built up in the middle in order to give it that plush, plumped up, heart shape which make the Angel Wings.
Before curing the clay I attached a brooch back to the under-side of the wings, so that the wearer could pin the wings to a coat or top. But … I did wonder if I could make these wings into a pendant, so I threaded a couple of links on a chain onto the ‘spike’ of the brooch back and VOILA! … it worked as a pendant too.
Size-wise, the brooch measures (approx) 5cm in length (top to bottom), which is just under 2″.
I liked this little brooch so much that I made a handful of them and gave them as little gifts to members of my family, and close friends.
The golden sheen you see to the feathers is Mica powder, which I gently brushed on before curing the clay.
. . . ‘inthe beginning’ was the start of the journey . . .
links hands in front of herself; looks down at her shoes Feels the start of a hot blush coming to her cheeks. Takes a deep breath in and says loud and proud . . .
“Hello my name is Cobwebs, and I’m a Crafter.”
There, that’s my confession out of the way, – now we can all sit down and eat cakes. YUM!
I’ve been a arty farty crafty all my life. From painting on a large scale, (spring flowers in a grassy meadow – on a school reception wall), right down to very small scale ATC’s which are miniature works of art measuring just 2 1⁄2 by 3 1⁄2 inches (or 64 mm × 89 mm in metric measurements).
Amongst many thingsI love to craft, make and work with, are:
hand crafted greeting cards.
needle felting – so relaxing – and amazing too! But painful if you get a bit cocky and look at the TV while doing it. (don’t do that – it hurts!);
Ranger Melting Pot – known here in the Emporium as ‘The Cauldron‘.
Polymer Clay – from the tiniest of flowers and Fairy Shoes (yes – fairy sized shoes) all the way up to long 12″ in length wands, a mixture of wood and clay and various ‘adornments’.
But . . . there’s more than just the few things I’ve listed above.
Please take a look around here on the Cobweborium Emporium blog – and perhaps even click to *Follow Me*, just by:- simply clicking the button over to the right, towards the top of the page. By doing that you’ll get an email to tell you when I’ve added something to the blog which you might like to take a peep at. (Yes, it’s that simple! You just click to follow me and then enter your email address. You won’t receive spam or rubbish, just an email to tell you a couple of lines about the new article I’ve posted on the blog here, and a link to click if you want to, which will take you straight to the new article!)
I plan to put as much effort in as possible into this ‘ere blog and hopefully have a little fun with everyone at the same time too … and I hope to bring you something(s) that you perhaps you might not have seen before as well. Oh . . . and you can leave comments too on this blog, so feel free to introduce yourself and say hello. I’d love to get to know the folks who are reading.
Have a truly blessed rest of your day! ~
P.S . . . You can find all the categories on The Cobweborium Emporium blog by looking over to the right in the column>>>over there >>>and finding:- ‘Categories on this Blog’ (the listed ‘names of categories’ underneath that title are all clickable and one click on any of those categories will take you directly to the category you’ve chosen).
You can alsoclick on the individual category names along the black bar – towards the top of every page. (except the Home Page, that’s not along the black bar – that’s over to the right with the others).