
I love to craft, but freely admit that I’m a bit of a ‘crop sprayer’. By that I mean that I don’t just stick to one craft. I make cards, tags, scrapbooks, boxes. I work with polymer clays, making anything from a tiny miniature mushroom, or fairy baby’s little face, right up to a fairy tower for a princess, with turrets and fairy door and .. well everything a Princess Fairy Tower would have! I love to re-cycle or up-cycle by turning unwanted into something brilliant; and …. I paint. When the mood takes I will paint anything which stands still long enough. Not painting as in ‘lets paint these walls a different colour’, but painting on: canvas, wood, paper, card, coffee tables, dining room tables, chipboard, … or anything which doesn’t move when I’ve got a paintbrush in my hand and a need to use it.
But, I actually started out my crafty adult (w-a-a-a-y over the age of 21 plus tax) years ‘potterying’. Not on a potter’s wheel, but the other kind. Hand building. I can’t call it sculpting because (to me) that word kind of presumes that I might be good at it. Now I wasn’t bad, – in fact I made things which sold well at Craft Fairs, etc. But I really don’t deserve the title of Sculptor. I’m no Master Craftsman in any sense or form!
I learnt this incredible craft by going once a week to a genuine real sculptor (a true ‘Master Craftsman’ – coo, the things that this person could turn out were MAGNIFICENT!) where I spent 3 hours each week, being taught how to do ‘stuff’. Once the ‘magic’ of this incredible craft opened up to me I LOVED it. The Sculptor brought out the best in me and showed me ‘how’ to do what I had in my mind to do, and how to get from a doodled drawing into something solid which I could amaze myself at when it was finished. (Half the time I couldn’t believe I’d made *that*!) But I wouldn’t ever have been able to make the things I did had it not been for this incredible Master of the art at Sculpting who shared all the knowledge with me.
And that’s the thing. We all need someone with a little bit of knowledge about something, who we can ask for some general help from when, we want to begin something but aren’t sure exactly what we even need to know which would give us the confidence to do the ‘thing’ – whatever that thing might be.
A fabulous blogger who follows our little blog here, by the name of Mrs. P. made a comment on a post I did on the blog, and in it she said….
“Have you ever done a post on the basics ~ please read that as … OK I want to try making a card / stamping, I’ve bought some stamps, an ink pad & even some die cut thingy’s and then realising I have the skill set of a 4 yr old …had a tantrum, put said goodies away only to retrieve them every now and again to stroke them, sigh deeply ~ repeat from tantrum to deep sighing on a regular basis”
When I read the comment I actually felt her pain, for when I first began stamping I did virtually the same thing. I tried them, the images weren’t the fabulous things I’d hoped for so I put them away. I tried again, and same result… and over a period of time I muddled my way through things and eventually learnt what worked and what didn’t. So .. here I am, a total un-expert, trying to hold Mrs. P’s. hand, and give any help I can to encourage both Mrs. P and anyone else who finds stamping a pain in the you know what. As I said… I’m not an expert .. but here’s what I’ve learnt and what I think might help out.
* I’ll be using both words and photographs as we go through this bit of ‘help’, and in order to do this I’ve had to take a ton of photographs and do some stamping with you at the same time. I’m sorry about there being so many photos. With regard to the stamping .. I’ve tried to, as much as possible, stamp like a regular new stamper. So that any images here will show you that the images you’re stamping are fine, and also how to make good any little mishaps you might have. I hope all this helps.

When you face that blank card in front of you, it’s right at that moment that your nerve goes. Your brain whispers thngs like:-. What if I make a complete ba**s up of this and waste time and a card and what if it all ends up in the bin? I’m sure I can’t do this! Don’t listen to it. You and I are going to prove to your brain that you’re the boss, and this stamping lark isn’t anything like difficult.
- But first .. some rules and guidelines.
- There are no rules.
- So lets get onto the guidelines:-
The better the stamp the crisper the image. I’ve found that red rubber stamps give the most magnificent impression, however I LOVE clear stamps because I can see exactly where I’m placing the stamp. It’s all down to personal preference. And you won’t know which you prefer until you’ve been stamping for a short while. (There are stamps about which look like red rubber stamps but aren’t. We’ll have to talk about that another time)
Ink Pads: I hate to say this because .. well, I’m a canny shopper and watch the pennies, but … from experience … the cheaper the stamp pad you buy, the less ‘lovely’ the image is likely to be. Obviously there are exceptions which prove the rule, but I’m just speaking from personal experience here, and because of that I don’t buy stamp pads from Ebay or anywhere other than recognised stores which sell crafty goodies. (Not necessarily craft stuff only stores. I’ll buy from The Range, which is a fabulous place to shop for craft items (here in the UK) and I also have a selection of more affordable DoCrafts embossing stamp pads which work BRILLIANTLY. But I don’t buy from market stalls or things like that).
CLEANING UP! … You MUST clean your stamps after you’ve used them. As soon as possible after you’ve used them. Personally – I use Huggies Baby Wipes. The reason I use this brand is because they have no Alcohol in them. (Lots of baby wipes do have alcohol, so check the list of ‘ingredients’ if you’re buying them for your stamps, as alcohol spoils the stamps! Why its used in BABY wipes is a total mystery to me … if I’m protecting my crafting stamps from alcohol, then surely we shouldn’t be wiping our babies btm’s and hands/faces with wipes containing it? Yes? No? Is that just me thinking like that?)
Anyhoo ... let’s begin….
1. Begin on a piece of scrap card. Play with your stamps just like a child would play with them. Stamp over and over. Just to remove the fear of the action of stamping and making a mangled mess of inky shapes on a bit of card.
2. Now turn your bit of scrap card over, once you’ve done the first exercise. Then grab your computer mouse mat. (If you haven’t got one of those, please buy one. Just a cheapy one – so long as it’s that squishy rubber or sponge type – rubber like neoprene rubber or sponge like a kind of firm foam sponge with a bit of ‘give’ – and then keep it just for stamping). In the meantime, if you haven’t got a mouse mat, use something like a folded FLAT weave – not the bobbly type – tea towel*. Fold it, make sure there are no creased up bits which will make marks on your ink. Then once folded neatly … put it on your work area, where you’ll be stamping, right in front of you. (*or an old pillowcase would do)
3. Put a plain sheet of A4 on top of it. Just copy paper. Nothing posh or expensive. Use the cheap stuff. This is so you won’t mark your mouse mat/tea towel/pillowcase nor your desk. You DO need that bit of paper. (You can also check out the colour of a stamp pad on it, and .. it will also keep your cardstock clean too).
4. Now place your piece of scrap card on top of that, making sure that it’s positioned firmly over the folded tea towel at the bottom of the pile of paper and card. You’ll find that if you stamp your image over the edge of the mouse mat etc, then you’ll get a really rubbish image with bits missing and the chance of the line of the mouse mat pressing into the cardstock and giving it a ‘bend’.
5. Choose your stamp, if it’s a wooden one then you’re ready to go, if it’s an unmounted stamp then choose a stamp block which is plenty big enough to hold the complete stamp.
6. Choose your ink pad … then tap your STAMP with the Ink pad. Don’t leave the ink pad on the desk and jab the stamp up and down on it. Instead, pick the stamp pad up and hold your stamp in the other hand and tapping the ink pad onto the stamp, move it around so that the ink pad gets tapped all over it, watching as you do it so that you don’t wobble the edges of the stamp or stamping block onto the inky surface. If you do this by accident, then either use your thumb to rub away the excess or use a baby wipe to wipe it away so that it doesn’t end up marking your card. This tapping all over the ink pad is in case there are any ‘cold spots’ on the pad, where perhaps the ink is just a tiny bit less intense. By moving the stamp pad over your stamp, in a tap, tap, tapping motion, you’ll ensure that you have inked all the raised parts of your stamp equally. Oh .. and don’t ‘drag’ your pad over your stamp, because you’ll end up with a build up of ink in places and it will transfer to your card, making an uneven colouring.
7. Carefully place your stamp down on your cardstock and press down, firmly but not hard. You aren’t trying to push it through the desk top! But you do want to ensure that all the raised parts of the stamp are in contact with the card. DON’T ROCK YOUR STAMP! If you do then you’ll likely get a ghost effect of parts of the stamp. If you’ve done that then don’t fret. It happens to everyone. Just stamp it again. At the moment we’re only playing anyway!

8. Now .. take another, different bit of card and place it on the desk top, but not on the pad of tea towel and A4 paper. Tap the same stamp you’ve just used, with the same ink pad, and then using the same firm press, press that same stamp onto that piece of card. Check out the difference between the two images. Which one looks best to you?
Some stamps will work and give you the exact same image every time. However most of the others won’t. Most images which a stamper produces are much improved by the use of a mouse mat, or the folded tea towel/pillowcase. There’s something in that bit of ‘give’ which just makes the impression so much sharper, neater, better. But … if your stamp works without it then that’s great.
Each stamp may need a different method, so the best thing to do is stamp your stamp on some scrap card or pape before you begin your actual project, so that you can give it a test first.
Now .. choose your favourite image which you’ve stamped and let’s colour it in. . .
How do you like to colour things in? Is your craft room complete with specialist pens, crayons etc which you paid a price for? Do you get along with those things? Do you get great results? If so, then use those. Use the method which you love the most.
Not everyone is a colourist (the name for someone who colours their images with specialist colouring pens/pencils). For those who either don’t like the results they get with pens, or would just like to try something a little different, or if you don’t have special colouring pens … then here’s something you can do which won’t cost the earth. All your need is a few paint brushes which are suitable for water-colours and your stamp pads.
Choose a colour from your ink pads which you’d like to ‘paint’ your image. Stamp that stamp pad onto your glass cutting mat. (If you don’t have one of those … do you have a glass cutting board in your kitchen? Could you ‘borrow’ it, just to use one corner of it, just for this teach in? If not – do you have a little plastic palette, the type used by painters? Or.. do you have one of those foam plates which you used to see as picnic plates? One of those would work fine too. Last suggestion … a spare odd saucer or plate – but wash it thoroughly before any food use. You’re using dye inks here – so if you have an odd saucer which you don’t use then that would be best.)

You need a little pot, or a saucer for some water. You don’t need much water – just about a tablespoonful – so you don’t need a huge, great thumping dish!
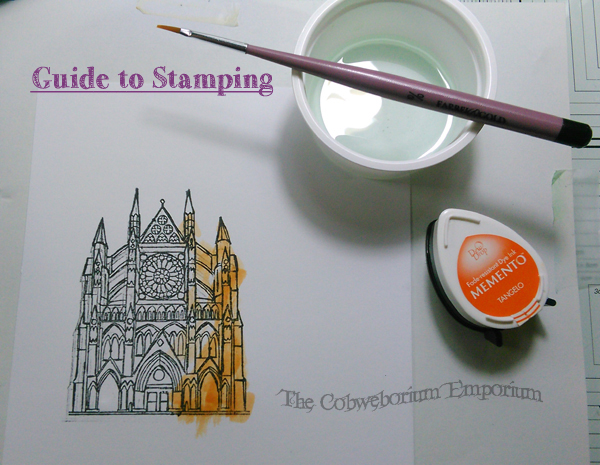
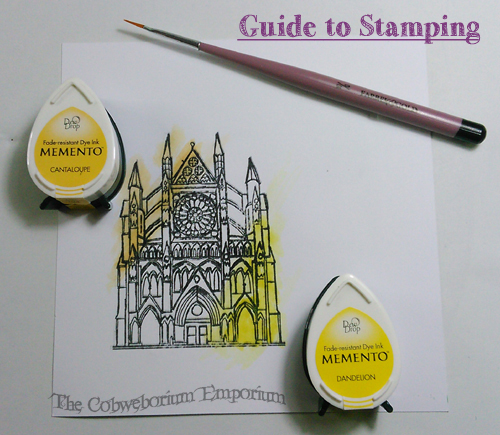
As you see in the photo above, I’ve stamped a Danube Blue Memento ink pad onto my glass mat. I dipped my brush into the little bit of water in the pot, then dragged most of the water off the brush, and only then did I tap my brush onto the glass mat next to the inky blob.
Use your brush to mix a tiny part of the inky blob and pick up some ink, and take it straight to your image. (don’t hang around as the brush will dry pretty quickly). Use a brush size which is appropriate to what your ‘painting’. If you have a tiny flower then obviously don’t use a one inch brush!. lol.
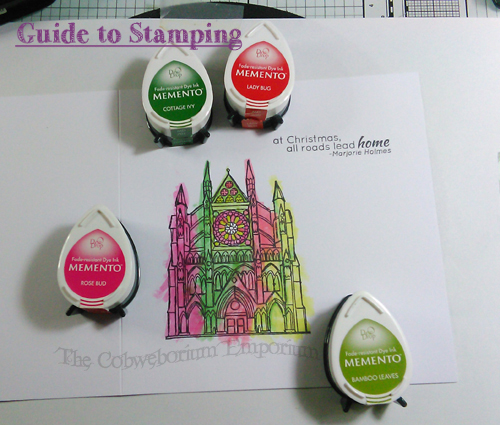
Use as many colours or as few, as you like. Colour your image in any way you want. If you’re finding that you can’t paint in a neat way .. then paint in a ‘Contemporary Art’ way. Blob, stripe, stroke, dabble or anything you like which works for you. Remember, we’re only playing so anything goes!

Once you’ve done that… colour one of your other images which you’ve stamped .. only this time in different colours. Pens/Crayons/Inks/Paints … anything you choose – just use different colours.

Ok ... let’s use some words now ….


Of course … You don’t have to colour your image in at all. You can leave it exactly as it is, and it can look rather swish and very classic. . .


Ok .. we’ve done that stamp. Let’s try a different one, and this time a different colour of stamp pad.
Lots of people only stamp in black ink. I’m not sure if that’s because they love the black ink so don’t want to try any other colour, … or if maybe they just haven’t thought about another colour … or if perhaps they have no idea about what colour to use so use black for safety. Different colours can give you different results. Even stamp pads from the same company. It’s not that the ink isn’t the same, it’s the colour which is different. Each colour will do things for you which another colour might not do.
Let’s try … grey….

But .. what would it look like in another colour?


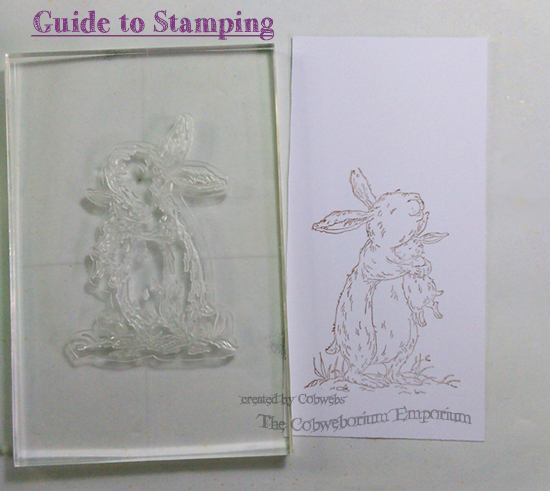
You can see how the exact same image gives a totally different ‘feel’ about it, simply by the choice of ink colour. If you want to stamp an image but are not sure of which stamp pad to use, then test stamp it first. Do a comparison like the one above of the rabbits. If you stamp them near to each other (but give a little space so that they have their own space to ‘be’) you’ll make choosing so much easier for yourself.
I think out of those images I rather like the Rich Cocoa colour in the middle. Let’s try that colour on another image …

Ok … so far we’ve only used an unmounted stamp here. Let’s try something different. Let’s go to a wooden mounted stamp, but let’s make it a difficult size. This next stamp is so big that I have difficult holding it in one hand.

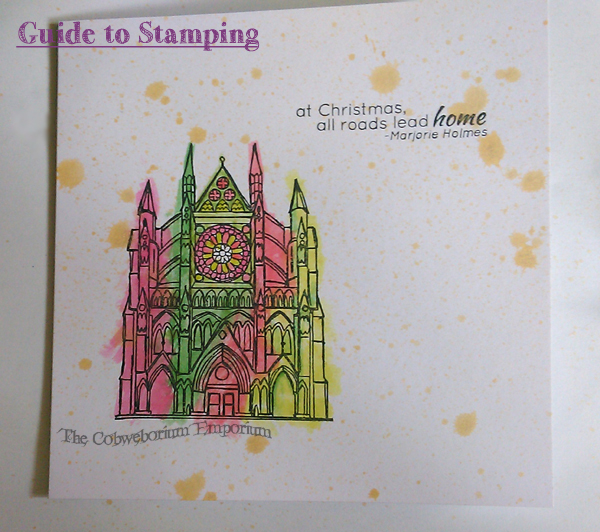
Large, detailed stamps such as the falling fairy one above, can be a tricky to decide on what colour to stamp it in sometimes. You can just use one solid colour stamp pad and stamp it out like the church I stamped (above), then you can colour the image afterwards in various ways. Or .. you can play around with your stamp pad colours and stamp the stamp in an assortment of carefully placed colours so that you have some colours there already … like this …
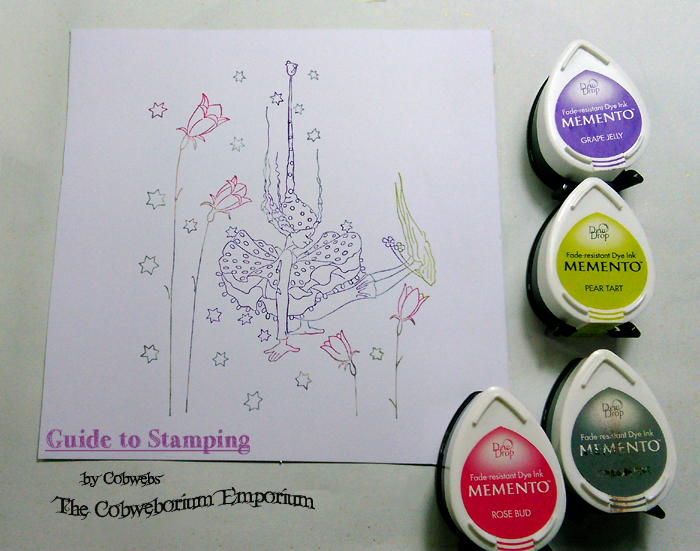
This multi colour stamping is a great trick. But … you have to be quick – unless you’re using embossing ink pads – those dry slowly so will allow you the extra time you require to stamp the inks onto the stamp.
But .. if using Dye Inks… they dry quickly, so you need to be quick applying the inks onto the stamp. BUT … here’s the trick… If you feel you might have taken just a few seconds too long:- Hold your stamp up to your mouth, open your mouth as if you were yawning a big yawn, but take a breath in and HUUUFFFFFF a long huff on your stamp.
Imagine you were trying to blow a candle out with your mouth wide open, or if you had some fingerprint marks on your glasses (spectacles) and you wanted to get them off using a tissue … you’d HUFF on the lens and then wipe it with the tissue). HUFF! You might want to huff a couple of times if the stamp is huge. But again … try it out on scrap card first. Then you’ll know what to do to make it work for you and your stamp.
Ok … Let’s move forward onto something more kind of grown up, but still a ton of fun.
But … I’ve kept you here for quite long enough for one day. How about we do the second part of this ‘helper’ tomorrow, so that your b.t.m.’s don’t loose all feeling and you don’t get DVT from sitting there reading this. 🙂
Well it’s Monday again, and yet again, someone has stolen three days from last week. I’d like to know who’s doing that, and if I catch the little divil, I’ll string him up by his ears!
All that’s left for me to say is … I hope your Monday is wonderful. Be it peace filled or full 0f excitement. Just … whatever you’re doing today … at some point stop and realise that right at that moment you’re making a memory. All you have to do is commit it to memory, memorise it, and then perhaps share that memory with someone later in the day. Share it with me if you like. I’d love to hear about it!
Sending oodles of l ❤ve your way. Have a good one my friends ~


OMGoodness …thank you !!!! I can see exactly how I can improve my non existent skills LOL
Your little pointers are most definitely going to get me back on track, I have poured over each ‘tip’ and can see why my images were look rubbish ~ oh and thanks for mentioning ‘The Range’ it never occurred to me to look in there for crafting supplies.
I’ll be getting my ‘toys’ out on my very next day off ( which will be over 7 days away boohoo ) any putting your expert guide into practice.
LikeLiked by 1 person
Aw, you are very welcome Mrs P.
As I said, I’m by no means an expert, and you might find someone on the web somewhere who will WAY better help than I. So take a look around for better help than mine.
There is still part 2 of this help guide to stamping … which I’ll schedule to post tomorrow. I think you might really enjoy part two, as it’s using stamps which you might not have yet tried, or even seen, before. They’re almost impossible to make a mistake with them and they’re lots of fun. (But .. I’m giving the plot away. Come back tomorrow and take a look…. [cue Kenny Everett] … “It’s all done in the best POSSIBLE taste!”) [giggling to self here]
The Range … Do go. But take plenty of money with you because you’ll likely be tempted to spend more than you initially thought you would.
Also … Take a peep in that well know ‘end of line’ book shop – The Works. Even on-line. You’ll be really surprised by what you can find there, and the prices will astound you. (But if you can, go into the shop as well because they’ll have things that might not be on the website because they’re low in stock, etc.)
Have a great day! (sorry to hear about the 7 days working with no time off, but it will be all the sweeter when it comes.)
l ❤ve ~ Cobs. x
LikeLike
I’ve seen some products at ‘The Works’ & was tempted but wasn’t sure about the quality now I’ll reconsider next time I’m there LOL
I have searched the web previously for tips, yet the way you have ‘talked’ me through the basics ~ the mouse mat ~ and simply playing around, has given me more confidence as I feel you ‘understand’ the fear of trying a new craft 🙂
LikeLiked by 1 person
I do.. I honestly do understand. And .. if there’s A.N.Y.T.H.I.N.G at all that you need an opinion on, help, advice, or just a point in the right direction .. please don’t hesitate to ask Mrs. P because I honestly truthfully don’t mind in the least, and if I can help I will. If I can’t, I’ll point you in the direction of where you can get help (even get a link for you if I can). So please feel welcome to ask about anything at all.
Sending big l ❤ ve, and wishing you a fabulous day! ~ Cobs. x
LikeLiked by 1 person
Thank you !!! no doubt when I get around to ‘playing’ there will be one or two queries LOL
LikeLiked by 1 person
what fun! A great tutorial, and of course I learned something – I always stamp on the hard table! I will try the mouse pad next time. 🙂
LikeLiked by 1 person
Aw, thanks Salpal. Yes, do try the mouse pad method. You might be surprised at the difference it makes, and it also helps you to apply the right amount of pressure.
Thanks for the comment. It’s always such a joy to see you and share a ‘coffee moment’ together. 🙂
much l ❤ve ~ Cobs.x
LikeLike
What a brilliant detailed post. It will be such a help for new starters. When I first started stamping it took me long enough to discover the difference between pigment and dye ink. Can’t tell you how many times I watched embossing powders slide gently off my dye ink outlines! Love the bright Christmas card too.
LikeLiked by 1 person
Hello PaperPuff, great to see you again!
Thank you so much for you kind comment. I too can remember trying to get embossing powders to melt instead of just blowing straight off a card…. before I realised that I needed a special ink pad. Aw, that took me weeks to work out that one. Thank Heavens for more and better information available today.
Thank you again for the time you’ve taken to comment and come and share a coffee moment with me. It means the world to me, so thank you.
L ❤ ve and crafty squidges ~ Cobs. x
LikeLiked by 1 person
You are so lovely. I need a squidge today! Am off to read part two…
LikeLiked by 1 person
aw (((PaperPuff))) <— a rubbish way of giving someone a hug, but it’s all I have available over the net … squidges are available here, free of charge, any time you want one .. or more.
Trust everything in your worl.d is groovy, and the squidge is ‘just because’.
Sending l ❤ ve from my little corner here, to your little corner there. ~ Cobs. x
LikeLiked by 1 person
Oh yes, no major dramas, just one of those days. A bit of mooching around blogs and maybe making a little something will put me right!! Hope you have a lovely day. xx
LikeLiked by 1 person
You too PP. We’ll mooch and play together. A few miles apart, but together in mind and heart. 🙂
l ❤ve Cobs. x
LikeLiked by 1 person
You should publish you know, cos that must have taken you an absolute age to type. Such a kind heart you have my dear, but I understand your need to give to others and that is the essence of you. Hugs Kim x
LikeLiked by 1 person
Hello Kim, one of my favourite crafters! 🙂
Thank you so much for your kindness in your comment. Yes, it did take a little while to type it up, but once it’s done, it’s put to bed and I’m a happy bunny. I’ve just finished typing up part 2, and that’s scheduled to post early tomorrow morning.
My kind heart … [nodding] I do have a great desire to be of help others. What good is the world if no one wanted to help another? I have a wish that each us would do at least one RAoK a day. (Randsome Act of Kindness). I swear that the world would begin to heal and become a way better place to live than the current war, hatred, bombings, killings, guns, and awful place that it’s become. We were given such a magnificent garden to play in and all we seem to be capable of doing is making it an unholy mess. {sigh}. These things worry me and trouble me greatly.
Aw, get down off your soap box Cobs, you know you can’t handle heights!! 🙂
Thank you so much, Kim, for coming and sharing a pot of coffee with me. I love seeing your name here.
Hope you and yours are all fine and dandy, and that now the heat is turned down a little, things are more comfortable at Chez Kims.
Sending crafty hugs ~ l ❤ve ~ Cobs. x
LikeLike
What a fab post! My stamps actually drove me to tears (well it was a Friday and it had been a long week at work!) I like to use chalks to colour because if I mess up I can kind of hide it. 😊
LikeLiked by 1 person
Chalks are so lovely … such a soft, beautiful effect and they ‘talk’ to each other so well.
Don’t let your stamps get the better of you. You tell them that if they don’t behave, you’ll put them into a drawer until they’ve learnt their lessons! Cheeky monkeys!
tsk tsk. ~ Cobs. 🙂
LikeLiked by 1 person
I need to make some cards (as in a lot, as I’ve left it to the last minute again!) so I may well stamp some cards (and win!) X
LikeLike
Ohhhh … you have a ‘last minute’ game that you play? Me too!
I shall be urging you on, via the ether, to over-come all adversities, and CONQUER THE
WORLDCARDS AND STAMPS!Leave conquering the world for another day, eh? lol
Have a great weekend MrsCraft! 🙂 ~ Cobs. x
LikeLiked by 1 person
The last minute game is the only game! I need to motivate myself, I’m still catching up on holiday washing and my craft area (conservatory!) is full of washing which the fairies have so far failed to fold and put away for me. Looks like it’s my turn again!
LikeLiked by 1 person
Ohhh … holiday washing! It’s such a horrible thing to have to do. All the fabulous fun and relaxing days .. and then back down to earth with a bump. ugh.
Well, despite the washing .. I hope your weekend is free of stress and that you find some time to switch off and relax a little.
~ Cobs. x
LikeLike
My goodness….talk about a complete lesson in stamping. Lol
LikeLike
I was asked, and I always try to be of help, so thought I’d be as helpful as possible.
(Although … I had a ton of stuff which I didn’t manage to cover!) – Cobs.
LikeLiked by 1 person
Thank you Cobs. This is great xx
LikeLiked by 1 person
Thanks Sharon. 🙂
~ Cobs. x
LikeLike
So true. Am a newbie still and so so awful at cards but give me tags and i am away. Made a card yesterday which went all good until end when it came to stamping and i botched up ! Typical but I guess thats how we all learn from our mistakes – or mine in my case 🙂
LikeLiked by 1 person
Hello ‘thecrafting’!
Aw it’s lovely to meet you and I’m so glad that you’re here.
I know the feeling of the last bit going wrong and messing up the whole card.
Here’s a tip …
If you have to put a stamped image or a sentiment on the front of a card you’ve already worked on … stamp onto a separate piece of card and do a cut out of it (die cut if you have a machine) and fix it to the card using some foam dots or foam strip adhesive, cut into short little lengths and placed strategically on the back of the thing you want to stick. THEN … remove the backing tape so that you’re ready to stick BUT … use a pair of craft tweezers to ‘place’ the sentiment/picture. (always make sure those tweezers are clean on the ends – because if they’ve got ink on them it will mark your card, – so just give them a wipe with a tissue or dried baby wipe first)
If however, the stamped image/sentiment is to the inside of a card … You can do a couple of things…
You can still do a cut out like I suggested for a sentiment on the front of the card.
OR
You can stamp straight onto the card. But if you mess up then you haven’t done all the work on the front for nothing. Simply cut the back of the card off the front of the card… then adhere that worked on front to another NEW blank card. BUT STAMP THE SENTIMENT TO THE CARD BEFORE YOU ADHERE the made front to it, so that you don’t worry about spoiling it.
TA DAHH!
Hope this helps … and hope you haven’t thrown that card away. There’s always a ‘rescue’ of one sort or another.
Very good luck with your stamping. Please don’t give up. Different stamps actually need a different way of handling them. Some stamps need you to press more firmly, and yet others need the lightest touch, like a kiss to a newborns head.
Thank you so much for the comment, and for joining our little band of merry crafters. It’s so lovely to meet new crafters. Everyone here is really lovely and all are more than happy to shout out if they can help anyone.
Welcome to the Cobweborium. You’re on the team now … so don’t be shy. Do say hello when you visit – and that way everyone will get used to seeing you and will recognise you.
Do you have a blog? If so, include your blog address by putting it in the ‘author’ of the comments bit – that way we can all come and visit you too! (and no doubt follow 🙂 )
Have a truly blessed rest of this fabulous Sunday! ~ Cobs. x
LikeLiked by 1 person
Thankyou for your kind words much appreciated. I did what you suggested and managed to cover up my mistake yesterday, Thank goodness. I will try and add my blog – fingers crossed i can do it lol. Thankyou again and look forward to many more posts 🙂 x
LikeLiked by 1 person
YAY! Cover ups are part of crafting. There are no mistakes, only happy accidents which help us to learn a new technique. (Cover ups is your new technique.)
~ Cobs. x
LikeLiked by 1 person
So so true 🙂 x
LikeLiked by 1 person
Not sure if this is correct but my blog is :- https://thecraftingbakinggodmum.wordpress.com/
Feel free to delete comment if link did not work lol x
LikeLiked by 1 person
I shall pop over and have a look around. I bet you’re amazing!
Sending squidges ~ Cobs. x
LikeLiked by 1 person
Kind words thankyou x
LikeLiked by 1 person
Fascinating, Cobs! I finally got here!
There’s more to stamping than meets the eye, I see, but the process seems easy enough. I shall return to the second post later, and allow this first one to filter through my brain… but thanks for this information.
LikeLiked by 1 person
It really is easy Tom.
But … I’m not sure that it’s this type of stamping you were after details of … but … there is a post on Monday morning (tomorrow) which mentions the stamps used for ATC’s and actually shows my favourite one. So if that’s what you were looking for … I show my favourite ATC stamp in that post.
Squidges ~ Cobs. x
LikeLike