When you capture a Fairy, you capture a moment in time. For you don’t actually capture the Fairy herself (or himself), what you’re actually catching is a fairy shadow. You see … a Fairy moves far too quickly to be caught in a jar, for no sooner have you got her inside the jar, than she’s popped out before you’ve even managed to even think about putting the lid on!
And back in the room again … (smiling here) …. Well I said that I’d like to make another Fairy in a Jar, and so I did. Only this time I remembered (mostly) to take photographs of each step as I did it, so that means this post is a little photo heavy, so because of that I’ll try to keep the talking to a minimum and just give you the point by point things which will explain what you’re looking at or need to know if you’re going to make a Fairy Jar yourself. Get ready… here we go….
I found a lovely new jar in Mr. Cobs shed which I swiftly took ownership of before he noticed it was gone, he kindly donated (cough) and I decided that this would make a fabulous fairy jar. I assembled everything which I’d need and began.
In the beginning …. the was a jar. A nice, clean, unused jar waiting to be loved.Add grass (of the card kind) using glue to stick it in place … only … this is where I found I’d run into a problem. I couldn’t get my hand into the jar. This is a very important point: MAKE SURE YOU CAN GET YOUR HAND INTO YOUR JAR BEFORE YOU BEGIN.
If you’ve found a jar which is narrow neckedand too long for you to reach the bottom using your fingers, or tweezers … then may I suggest that you buy some extra long tweezers before you begin. You can find them in .. Pet stores (particularly ones which sell Lizards or food for Lizards). Or you can find them on Ebay, or at some Kitchen/Cake making supply stores.
I didn’t have extra long tweezers at the time I was making this Fairy Jar, so I did my best with what I had. (And made an unholy mess too! – see inside the jar!)Because this particular jar wasn’t straight sided down to the bottomit meant that there was a gap between the bottom of the ‘grass’ and the base of the jar (which would have let the light shine out and it would have looked odd) .. I remedied this by twisting a little bit of black tissue paper and glueing it in place. Again … a mess happened, but I used glue which dries clear so I knew that it wouldn’t be seen once dried.While the glue dried, I turned my attention to the lid ….
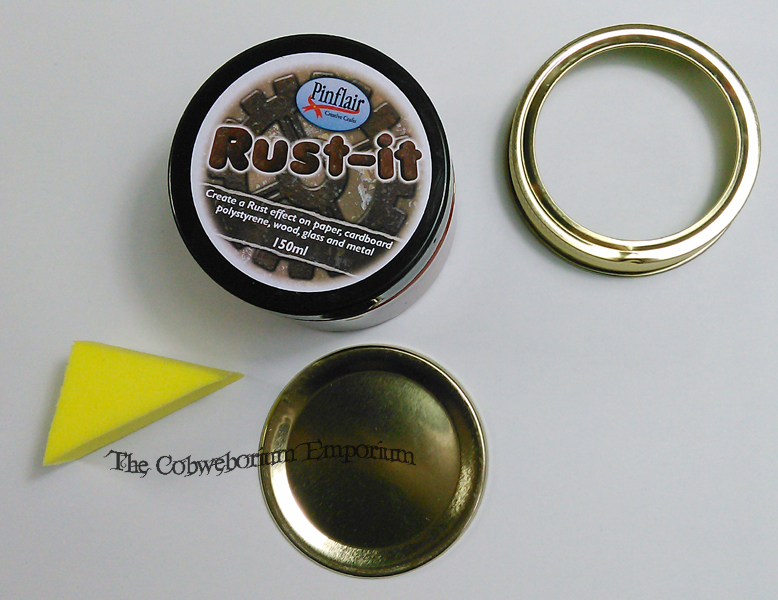
I didn’t want a shiny gold lid, but wanted something which looked old and almost creaky, so wanted to ‘rust up’ the jar lid. I used a tried and trusted method, using Rust-it, made by Pinflair which always gives great results. One coat works well, but two coats really takes it to town! (And each coat dries really quickly – so you’re not hanging about all day for it to dry.)
Two coats of Rust-It,and it looks like I found it in a good old-fashioned English, secret, walled garden. Perfect!
Although it was now lovely and old-looking, I wanted to give it a little something to make it more special….
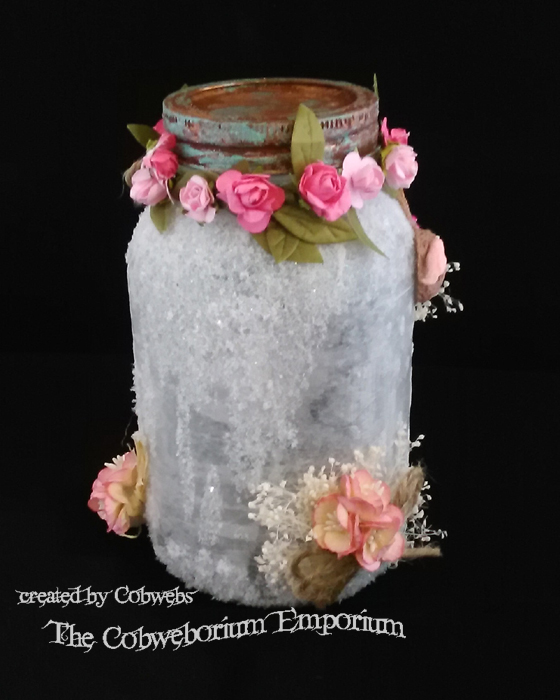
Glitter Paste by Pinflair, in Aqua and Copper. The paste looks thick when you open the lid but it’s a lot more ‘fluid’ when you start to use it. It spreads very easily, so apply a little at a time as it goes a long way.
I missed taking a couple of photographs at this point as I got carried away with myself … so I’ll have to catch you up with words …
By this time you should have chosen your fairy and are ready to add her to your Fairy Jar. Simply choose the position you want her in and then using an instant fix glue(we call it Super Glue here in the UK. It bonds in seconds and can be used on paper and glass amongst other things). This will hold your Fairy in place.
Once you’re happy that she’s not going anywhere … you’re ready to adhere some tissue paper to the outside of your jar. You can simply use PVA glue for this, and just one sheet of tissue paper. (one sheet thick – if you need more tissue to go around your jar, obviously use more. But only one sheet thickness).
Spread PVA over part of your jar, (make it a full bottom to top section, but not covering the screw part where the lid fits, obviously) then lay the sticky part down on your sheet of tissue paper, lifting it up straight away, otherwise the glue will quickly make the tissue tacky and it will stick to your work surface. eeeek!
Do this all over your jar, in sections at a time, until you’ve covered the whole of the jar. Allow it to dry. (Give it about an hour). Then you can begin decorating the outside.
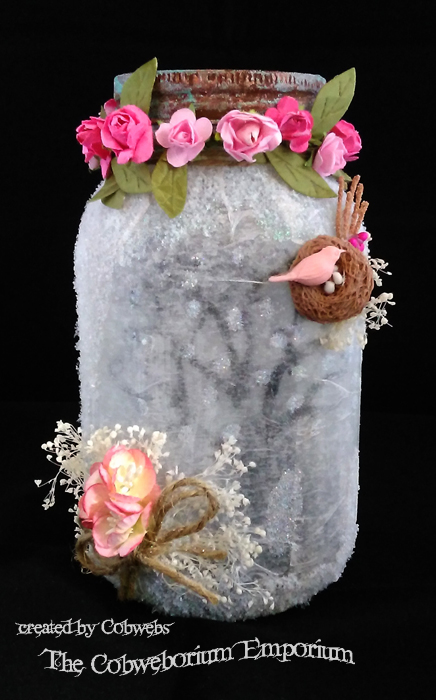
Add some magic to the outside of your jarusing glitters and anything else you feel will give you the result you want. Here you can see that I’ve used a mixture of Pinflair Ice Diamond – which is really chunky type glitter – but it’s not twinkly like normal glitter. It’s got a fabulous magical feel to it. I also added just a tiny bit of Pinflair Snow Dust – just to give the outside a sort of crisp look.For this jar I tied string around the neck,however you can use ribbons, straw, or anything which gives you the look you’re after. (On the previous Fairy Jar I made, I used a hessian ribbon – which I loved. You can find that jar on the Cobweborium blog).Then … add your flowers … or anything else you’d like to have on your Fairy Jar. You can personalise it in a gazillion ways. Whatever takes it in the direction you want it to go!There are many things you could add to your Fairy Jar.Here, on this, (2nd) Fairy Jar, I’ve added a ‘Key to the Land of the Fae’, and a tiny vial of ‘Fairy Dust’, which has been corked and then sealed with pink wax.The Key to the Land of the Fae, and a glass vial of Fairy Dust.One side of the Fairy Jar ….The other side of the Fairy Jar … but … this jar has a secret …. and it’s on the back …Hidden within the jar isn’t just a Fairy, but it also hides a Fairy Wishing Tree! On the outside of the back of the jar, I added some nature, some nurture and some love.
Time to add a little magic. Shall we?
The inner light, although magical looking, is made by T.Lights. BATTERY operated T. Lights. Please, please don’t use real candles. Paper, card and candles don’t mix well. Only ever use battery operated T.Lights inside Fairy Jars.The Fairy Wishing Tree, lit from within.The side of the Fairy Jar … but do you see what I see? There is one light at the base …. and another light half way up the jar. How can that be? Is it floating? Is it … MAGIC?
If you’re making a Fairy Jar for yourself, you’ll find that it’s best to use smaller fairies as the lights from your T.lights will only shine and flicker at the base of your jar. However, I wanted to use a larger fairy, so had to figure out a way to let a light shine further up the jar. I could have bought some of those short lengths of craft lights – a little like Christmas Tree Fairy Lights – only made for crafters and operated by battery, but I wanted that warm glow that you get from a candle so … I found a way of making that happen. ….
I made a little gizmo out of Florist’s Wire, which I loosely wrapped around the ‘flame’ of the lower candle and then supported another candle which kind of hovered about it. I’ve taken more photos from other angles so that you could see how this wire frame works…
Make sure, if you make one of these,that you bend the end of the wire at the top so that you don’t put your hand inside the jar and get stabbed by it. It would be jolly painful! So bend it over and make a sort of handle so that you can easily lift it out of the jar to turn the candles on/off.Photo taken from ‘underneath’ showing how the wire is bent under the upper T.Light, to support it. Then shaped around the outside of the T.Light and over the top, and around the ‘flame’ to anchor it.Photo taken from over the top of both of the candles.You can see that the candles pretty much line up, and also how the wire extends over the top of the candle and wraps gently around the flame to just keep the wire in place.
This wire support isn’t made of stiff wire, but it’s ‘bendable’ wire, so take a little care when using it. But if you knock it out of shape when you’re turning the T.Lights off and on, then you can easily just fiddle with it to make it stand up again. Once you get used to the way it needs to be bent, you’ll get the hang of it.
I loved making this Fairy Jar and particularly loved the little roses I chose. They were exactly the shade I was thinking of in my mind, and as if by magic … there they were!
Well that’s me done and dusted.
Hope you’ve had a good weekend, and that your week ahead turns out to be a happy one without too many problems or struggles, and that any problems you come across aren’t anything which you can’t handle.
Thank you SO much for coming and sharing some time with me. I so enjoy your company. Please feel welcome to leave a few words via a comment, and I promise to reply. I love your comments as it gets us all chatting to each other, and other people reading get a feel for what you’re like and will want to come and visit your blog too. It makes blogging world go around so well!
If there’s anything which I’ve forgotten to mention and you’d like to ask about, please ask away. I’m more than happy to help if I can.
Well all that’s left for me to say is … Have a truly Blessed rest of your day!
Author: The Art of Cobwebs - aka:- thecobweboriumemporium
Hello.
I'm 'Cobwebs'.
I live in a wee little cottage in the South of England, aptly called Cobweb Cottage. This little dwelling really is a cobweb factory. Not inside (well, occasionally) - but outside - flipping heck!
This information should give you a clue as to why my blog is called The Art of Cobwebs aka: The Cobweborium Emporium.
I've been arty and crafty from a very young age, and although my crafts have sometimes turned a corner and taken me in another direction, I've always crafted in some way, shape or form.
One day, in the blink of an eye, life changed somewhat for me and the consequences were many. I had to find a new way of being 'artistic'.
Card making; scrap-booking; producing ATC's and ACEO's; needle felting; Polymer clay; painting- but in a more relaxed style than I had before, and sewing, - are all things which I visit, as and when life allows.
I've fairy recently become a Textile Artist and am enjoying this new creative outlet very much as it offers me so much scope for letting my imagination run through a grassy field and feel the wind in my hair - (mentally, of course).
I love to create. To make things. I truthfully believe that the best gifts in the world are those in which you've given your time, rather than your cash.
Thank you so much for visiting. Please visit my blog (link below) and have a look around. I'm sure you'll find something to enjoy, even if it's only a handful of jokes! (yes, seriously - there really are jokes!)
Wishing you a truly blessed rest of your day! ~ Cobs. <3
View all posts by The Art of Cobwebs - aka:- thecobweboriumemporium
23 thoughts on “A Fairy captured in a Fairy Jar”
Hi Cobs, beautiful jar, certainly looks like you have been waving the magic dust! I just wanted to say, I popped into our local works at the weekend, and they have heaps of lovely goodies, of which I indulged! Thanks for the tip 🙂 Hugs x
Hello Hannah. Yes, I reckon your daughter is just the right age to have a ‘go’ at making one of these. I hope you both have heaps of fun and that your Fairy behaves well!
Crafty squidges ~ Cobs x
Love love love it. The Range has finally opened a shop in this region so heading there to spend my pennies …… not that I need any encouragement Cobs. But thanks for sharing 😜
Aw THRILLED that you’re able to shop in The Range. They have a fabulous selection of crafty goodies at affordable prices, and they reduce regularly as new stock arrives and they have to make room the new stuff, so watch out for those reductions as I’ve bagged some really great bargains!
Thanks for the visit, Crafty Pixy! Sending crafting squidges ~Cobs. x
Hello Roxsnne.
The fairy … yes glued to the jar itself BUT … with just a little glue in the right places. I tend to use Glue Gel – and I apply it (scrapingly) with a toothpick, so that I can ensure that there aren’t great gobbits of glue.
Once glued – leave it for 24 hours to set, so that you don’t disturb where you’ve positioned it.
Aw thank you ‘watching the daisies’. I’m thrilled that you like the idea. They’re such a joy to make, and you don’t even have to keep it as being fairy themed. You could put anything you like in a jar and dress it up.
As for me being ‘gifted’ … bless you. I’m just enjoying myself. lol
Have a truly blessed rest of your day. ~ Cobs. x
Hello Nessie.
Thank you so much for your lovely comment, and I’m delighted that you like the Fairy Captured in a Jar.
You really must have a go at making yourself one. They truly are a delight – lit or unlit.
Have a blessed rest of your day ~ Cobs.x
Just seen this…oh it’s fabulous! I would have loved this when I was a little girl! Mind you, I love it now, a wonderful decoration for a midsummer’s party! Great make! 😺💕xxx
Hello Samantha! 😀
Aww, I’m totally delighted that you like this Fairy Dress Card, and I’m totally in agreement with you … I would have LOVED this card to be sent to me when I was a girl… but would treasure it even now.
I think as we get a little older and wiser, we see thing that we miss as young children. We see the beauty and workmanship as an adult. As a child we see the magic and dreams.
Yes, would be great for a midsummer party! What a fabulous idea. 😀
Thanks for coming Samantha … love seeing you.
Squidges coming your way ~ Cobs. x
Love the fairy jar, would very much like to know we’re to find the lovely flowers. I live in Texas and I’m finding it hard to find pretty flowers the size I need for my fairy jars.Thank you
Hello Debra. lovely to meet you. 😀
Finding the right flowers is something that can be a really difficult thing to do. We have this vision inside our minds of what the flowers will look like, so we go searching for those flowers, and will discard anything which doesn’t look quite like the thing we want.
My biggest suggestion is to have a box where you store your flowers. (I have a large see through plastic box – so the light can get in and make it easy to see what I’m after). Then … don’t just buy flowers when you need them. Instead buy flowers when you see them and like them. But the trick is to actually LIKE them.
You might not have a project that you need them for right now – but I can promise that you WILL have a project soon, and the flowers will already be there.
Because I live in England (UK), and you live in Texas (US), I can’t share with you the actual stores and on-line places I find flowers as anywhere I shop for them won’t be available to you – but I can tell you that craft stores, and general stores which supply bits and pieces for weddings might be a place to look.
I believe that a lot of crafters in the US shop at a place called Michael’s – but I’m not sure if you have one of those in Texas.
On-line – there will be places which sell things just for crafters and they may have a floral section where you can buy a selection of flowers. Even Ebay might bring about something that you’re in need of. Obviously you’ll need to know the size of the flowers that you need.
Other than these suggestions, because of the distance we live apart, I’m afraid I can’t help any further. Sorry about that.
Very good luck with your Fairy Jar. They’re a true delight when made and you sit back to look at them. Very worth the time.
Regards and …. have a blessed rest of your day! ~ Cobs. 😀
No I don’t sell them. However, I know that there are some crafty folks on Ebay and also on Etsy who sell them. Try there!
Apologies for the late reply… unfortunately Life got in the way of blogging and I’ve been absent from my blog. But … better late than never.
Thank you so much for coming. Good luck with the finding of a Fairy Jar. ~ Cobs.


Hi Cobs, beautiful jar, certainly looks like you have been waving the magic dust! I just wanted to say, I popped into our local works at the weekend, and they have heaps of lovely goodies, of which I indulged! Thanks for the tip 🙂 Hugs x
LikeLiked by 1 person
Hello lovely Kim. Aww I love to see your name here. You’re like a sunbeam. Bright, wonderous and makes everyone feel happy.
Happy to hear about your visit to the Works. I’m planning to pop in sometime this/next week. I hope you left me something! LOL. 🙂
Thank you so much for visiting Kim.
Sending crafty hugs your way ~ Cobs. x
LikeLiked by 1 person
That is such a fab idea. Maybe something I try with my nearly 8 year old daughter. So effective once the candles are ‘lit’. Hxx
LikeLiked by 1 person
Hello Hannah. Yes, I reckon your daughter is just the right age to have a ‘go’ at making one of these. I hope you both have heaps of fun and that your Fairy behaves well!
Crafty squidges ~ Cobs x
LikeLiked by 1 person
Fabulous, magical make 🙂
LikeLiked by 1 person
Thank you, Gail! 🙂 ~ C. x
LikeLike
Love love love it. The Range has finally opened a shop in this region so heading there to spend my pennies …… not that I need any encouragement Cobs. But thanks for sharing 😜
LikeLiked by 1 person
Aw THRILLED that you’re able to shop in The Range. They have a fabulous selection of crafty goodies at affordable prices, and they reduce regularly as new stock arrives and they have to make room the new stuff, so watch out for those reductions as I’ve bagged some really great bargains!
Thanks for the visit, Crafty Pixy!
Sending crafting squidges ~Cobs. x
LikeLike
Did you glue the fairy right on the inside of the glass? It’s hard to tell from your pictures. Thanks.
LikeLiked by 1 person
Hello Roxsnne.
The fairy … yes glued to the jar itself BUT … with just a little glue in the right places. I tend to use Glue Gel – and I apply it (scrapingly) with a toothpick, so that I can ensure that there aren’t great gobbits of glue.
Once glued – leave it for 24 hours to set, so that you don’t disturb where you’ve positioned it.
Hope that helps! ~ Cobs. 🙂
LikeLike
I love this idea. I used to visit fairy dells as a child and this was such a magical post. You are soo gifted.
LikeLiked by 1 person
Aw thank you ‘watching the daisies’. I’m thrilled that you like the idea. They’re such a joy to make, and you don’t even have to keep it as being fairy themed. You could put anything you like in a jar and dress it up.
As for me being ‘gifted’ … bless you. I’m just enjoying myself. lol
Have a truly blessed rest of your day. ~ Cobs. x
LikeLiked by 1 person
Hello Cobs!
What a beautiful idea! I’m definitely going to have a go at making these! I love anything fairy themed.
Thank you so much for sharing your local beautiful jar.
Sending lots of happy, magical fairy dust 😊 xxx
LikeLiked by 1 person
Hello Nessie.
Thank you so much for your lovely comment, and I’m delighted that you like the Fairy Captured in a Jar.
You really must have a go at making yourself one. They truly are a delight – lit or unlit.
Have a blessed rest of your day ~ Cobs.x
LikeLike
Magical!
Sunshine, New Zealand.
http://www.ihearttostamp.blogspot.com
LikeLiked by 1 person
Thank you. 🙂
LikeLike
Just seen this…oh it’s fabulous! I would have loved this when I was a little girl! Mind you, I love it now, a wonderful decoration for a midsummer’s party! Great make! 😺💕xxx
LikeLiked by 1 person
Hello Samantha! 😀
Aww, I’m totally delighted that you like this Fairy Dress Card, and I’m totally in agreement with you … I would have LOVED this card to be sent to me when I was a girl… but would treasure it even now.
I think as we get a little older and wiser, we see thing that we miss as young children. We see the beauty and workmanship as an adult. As a child we see the magic and dreams.
Yes, would be great for a midsummer party! What a fabulous idea. 😀
Thanks for coming Samantha … love seeing you.
Squidges coming your way ~ Cobs. x
LikeLike
Love the fairy jar, would very much like to know we’re to find the lovely flowers. I live in Texas and I’m finding it hard to find pretty flowers the size I need for my fairy jars.Thank you
LikeLiked by 1 person
Hello Debra. lovely to meet you. 😀
Finding the right flowers is something that can be a really difficult thing to do. We have this vision inside our minds of what the flowers will look like, so we go searching for those flowers, and will discard anything which doesn’t look quite like the thing we want.
My biggest suggestion is to have a box where you store your flowers. (I have a large see through plastic box – so the light can get in and make it easy to see what I’m after). Then … don’t just buy flowers when you need them. Instead buy flowers when you see them and like them. But the trick is to actually LIKE them.
You might not have a project that you need them for right now – but I can promise that you WILL have a project soon, and the flowers will already be there.
Because I live in England (UK), and you live in Texas (US), I can’t share with you the actual stores and on-line places I find flowers as anywhere I shop for them won’t be available to you – but I can tell you that craft stores, and general stores which supply bits and pieces for weddings might be a place to look.
I believe that a lot of crafters in the US shop at a place called Michael’s – but I’m not sure if you have one of those in Texas.
On-line – there will be places which sell things just for crafters and they may have a floral section where you can buy a selection of flowers. Even Ebay might bring about something that you’re in need of. Obviously you’ll need to know the size of the flowers that you need.
Other than these suggestions, because of the distance we live apart, I’m afraid I can’t help any further. Sorry about that.
Very good luck with your Fairy Jar. They’re a true delight when made and you sit back to look at them. Very worth the time.
Regards and …. have a blessed rest of your day! ~ Cobs. 😀
LikeLike
Do you sell these?
LikeLiked by 1 person
No I don’t sell them. However, I know that there are some crafty folks on Ebay and also on Etsy who sell them. Try there!
Apologies for the late reply… unfortunately Life got in the way of blogging and I’ve been absent from my blog. But … better late than never.
Thank you so much for coming. Good luck with the finding of a Fairy Jar. ~ Cobs.
LikeLike