Hints, tips and part 2 of the ‘Guide to Stamping’.
Hello again! 🙂
Yesterday we went through the Rules (there aren’t any) and Guidelines for getting better images when stamping. We learned the importance of a mouse mat. We stamped the same image a few times. We stamped it in different colours too and saw what a difference that made to the end result stamped image. We chatted about stamping an image in different colours all at once. And we did a bit of colouring of images once they’d been stamped, using a rainbow selection of coloured stamped pads.
Today we’re going to move on to something a bit more fearful. Sorry. I meant to say …Fearfully Easy. An impressive bit of stamp magic which, if you don’t know about these types of stamps yet, you’ll be surprised about.
A blog I follow (PaperPuff ) summed up these particular stamps beautifully when she herself tried them for the first time a few weeks ago. She called them the stamps of the Three ‘Oh’s. smiling to myself here because I knew what she was talking about and she’s right. They really are Three Oh’s. You’ll see why … Shall we begin? Seatbelts on… handbags on the floor …. Let’s go!
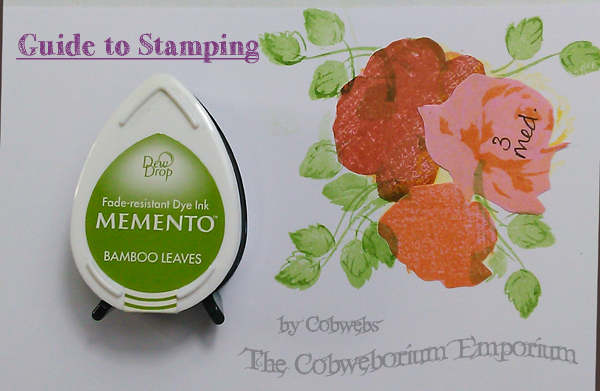
These are Altenew Stamps. I’ve blogged about them before, but this time I’m talking about them because I think anyone who’s having a problem with their stamping should absolutely have this set (or one of their other sets) in their ‘armoury’.
There are a couple of brands of stamps which allow me to put together a ‘story’, in stamped images, in different ways. Even if I use the exact same stamps over and over, I can actually still make one-off cards – each of them totally different from the last.
These two brands are:
Card-io Stamps– which I adore, these are available direct from Card-io themselves, (their name is a clickable link which will open in a new window) ...
and . . . the fairly recently introduced into this country: Altenew Stamps. You can now buy quite a selection of the Altenew Stamps from various places which you can find on the web. Google ‘Altenew’ and it will give you suppliers. (I use ‘My Mums Craft Shop’ and have had only great service from them – but shop around. You may find a supplier close to where you live.).
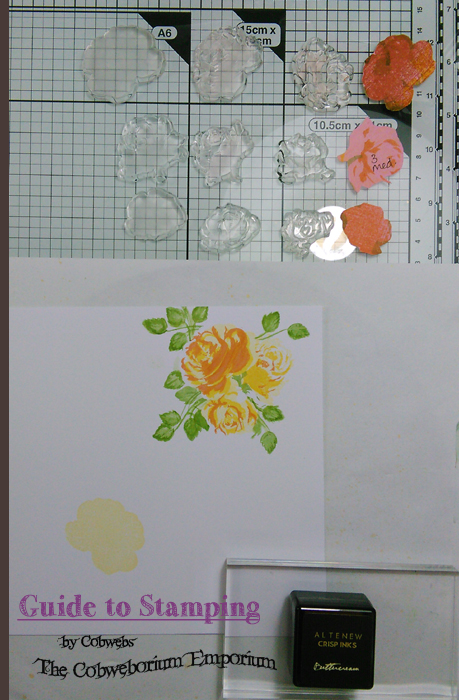
For this ‘play around’, I’m going to use the Altenew Stamps, Vintage Rose collection,shown in the last photograph.
Some of the Altenew stamps come in big sets,like the set in the photo above, but within that set is a collection of smaller ‘groups’. In this set, each group makes one rose for you, in different shapes and sizes, and there also different sets of leaves, again, different shapes and sizes.
In this photo I’ve tried to show you how I pick out each group that I’m going to use, and I pop them down in their group (in lines – top row is the large rose, middle row is the medium rose & bottom row is the small stamp) so that I don’t have to keep peeling them off the carrier sheet.
I’ve chosen to stamp a larger rose. The particular stamped image I’m going to stamp has 3 different stamps just to make one rose. In some ‘groups’ of the larger set, there may be 4 stamps to make just one image. Keep reading, it’s not as difficult or as scary as it sounds…. 🙂
One Stamp. One pale yellow colour stamp pad. The combination of which gives us . . . a frankly underwhelming image. . . . . . ‘Oh’ – number one!
You stamp the palest colour first. The paler colour of the roses tones. I’ve chosen the Yellow set of cubes from the Altenew Pads here – but if you have a selection of tones in the same colour way eg: four different shades of red/pink, or blue, or green etc etc, then you don’t have to buy the stamp pads just to use the stamps.
Then, using the second rose stamp in the group and the next colour,which is slightly darker than the first pale colour. . . . ‘Ohh!’ – number 2.
As I mentioned above – In some sizes of roses there will be three stamps, in others there will be four. (Hence the reason that the Altenew mini cubes come in sets of four).
Mmmm.. what’s happened here then?? (I hear you ask)… well, I want to show you OH! number three, but I wanted to make sure that it impresses you in such a way that you really do ‘get it’. I’ve covered up the finished Large and Medium sized roses which I’ve already completed, and this last rose, the small one, is at that ‘second stamp’ stage …That small rose has now had its 3rd colour from the stamp pads, but you can’t really see what I’m trying to show you about how these stamps will make you look like the Stamping Expert of the Year. Let’s continue and see where this goes …This time I’ve covered up all three roses. But … I’ve added some leaves on vines.
If you’re going to ‘build’ a picture with these stamps – in this case a rose, – you have to start with what’s in the foreground and then follow it up with whats in the background. But in order to do this you complete each section at a time, but then cover up that section so that you don’t stamp over it and spoil what you’ve done. As you can see in the photograph above, as I’m stamping the leaves and vines, some of the leaf/vine stamp is actually stamping onto the ‘covers’, – so, imagine the mess they would be making on the roses if I hadn’t covered up the work I’d already done. (If this sounds complicated, don’t fret. It’s honestly not … as you’ll see …..)….
Now the leaves in the photograph are fine and groovy, but … they don’t have any shadows, or veins to the leaves….. so let’s pop some in.
I’ve stamped in the veins and shadows … but I’ve purposely ‘missed’ the right places on the leaves by just ‘off center’ with the stamp. This ‘miss’ is a prolem that can happen to all of us at some time, so don’t beat yourself up or trash what you’ve worked hard on. It’s not the end of the world. Like I showed you yesterday, in part one of this guide, you can ‘paint’ with your stamp pads! So this can be put right really quite easily. Stamp the ink pad on your glass mat (or plate, saucer etc) and then dip your paint brush into a little water, but take off as much of the water as possible but leaving the bristles damp enough to ‘mix’ into the inky blob and then ‘smudge’ & paint the already (miss)stamped bit. Then simply ‘paint’ the veins of the leaves just a little ….. practise this a little on scap card. You’ll soon get the hang of it.No gaps between leaves and veins now. So … are you ready to look at the roses? . . .The third ‘Ohhh!’ . . . You can see how masking off the roses means that the vines and leaves don’t make a mess of the images you’ve already stamped.
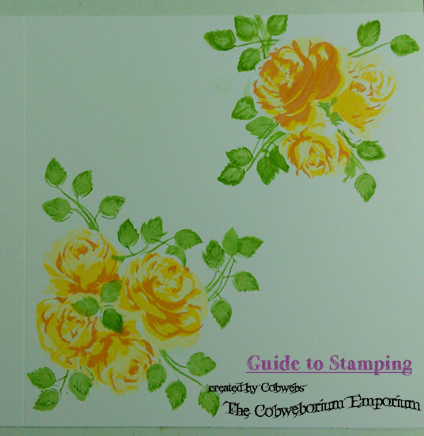
So .. let’s stamp the other corner of the card in the same way …
I’ve stamped a group of 4 roses in the bottom left corner, so that you can see that even though two of the roses are the same, they look different because the stamped images have all been turned around and stamped differently. and the leaves are all different – even though they’re the same!Shall we make a sentiment for this card?In this photo I’ve stamped that same word in three differently places. The top image I stamped on my glass mat. The middle image I stamped on my desk top. (That’s not the light giving that effect … that’s a missing part of the image. And finally … the bottom ‘Amazing’ was stamped using the mouse mat, copy paper and then card sandwich. You can see that the mouse mat really does make a difference.If you don’t have a sentiment which says what you want to say, simply bring in other stamps, stamp them on scrap card and then use them together.
I’ve cut out the stamped sentiments then mounted them on some narrow foam tape and place them on the card. The foam tape gives a little dimension to the card.
I’ve taken three photographs of this finished card, in different lights, so that you can get a reasonable idea of the brightness of the stamped colours which the stamp pads provide.
Lights full on, so that it’s heaps brighter.Some bunnies wanted to say bye-bye!
These stamps really are easy to use, and I highly recommend them – for new stampers and stampers who have been stamping for years. They really are such a great addition to your stamps.
Phew ... well that’s where we end on our hints and tips Guide to Stamping. If there is anything I haven’t mentioned that you hoped I would, then please tell me in a comment and I’ll do my very best to help. I’m not an expert. I’m a crafter, like you, and these are things that I’ve found work for me, and after a plea asking for some help, I made this ‘Guide’ to help a fabulous lady, Mrs. P, but I’m also hoping that it might help someone else along the way too.
Thank you so much for visiting and having a coffee with me. I love your company, as you know, and the fact that you visit really does mean the world to me. So thank you for coming.
May your Tuesday be filled with love and smiles. Sending crafty hugs and oodles of l ❤ve ~ till next time …
Author: The Art of Cobwebs - aka:- thecobweboriumemporium
Hello.
I'm 'Cobwebs'.
I live in a wee little cottage in the South of England, aptly called Cobweb Cottage. This little dwelling really is a cobweb factory. Not inside (well, occasionally) - but outside - flipping heck!
This information should give you a clue as to why my blog is called The Art of Cobwebs aka: The Cobweborium Emporium.
I've been arty and crafty from a very young age, and although my crafts have sometimes turned a corner and taken me in another direction, I've always crafted in some way, shape or form.
One day, in the blink of an eye, life changed somewhat for me and the consequences were many. I had to find a new way of being 'artistic'.
Card making; scrap-booking; producing ATC's and ACEO's; needle felting; Polymer clay; painting- but in a more relaxed style than I had before, and sewing, - are all things which I visit, as and when life allows.
I've fairy recently become a Textile Artist and am enjoying this new creative outlet very much as it offers me so much scope for letting my imagination run through a grassy field and feel the wind in my hair - (mentally, of course).
I love to create. To make things. I truthfully believe that the best gifts in the world are those in which you've given your time, rather than your cash.
Thank you so much for visiting. Please visit my blog (link below) and have a look around. I'm sure you'll find something to enjoy, even if it's only a handful of jokes! (yes, seriously - there really are jokes!)
Wishing you a truly blessed rest of your day! ~ Cobs. <3
View all posts by The Art of Cobwebs - aka:- thecobweboriumemporium
13 thoughts on “Hints, tips and part 2 of the ‘Guide to Stamping’.”
Goodness how brilliant, thank you once again for a little hand holding, your descriptions are very clear and precise, I now feel confident enough to take the first wobbly steps into the world of stamping ~ I can also foresee a highly necessary shopping trip on the horizon …you know … purely in means of research & broadening my horizons … who am I kidding I want / need pretty stamps LOL
Actually smiling big time about the shopping trip. Enjoy yourself … I’ll be on your shoulder cheering you on! (or should that be ‘egging you on’? lol) 🙂
Again .. if there’s anything I’ve forgotten to mention here, or you’ve seen something you need more details on, just ask away. I promise I’ll reply and help … and I also promise I won’t think you’re a pain in the ‘uknow’. I’m honoured and delighted to help.
Heaps of l ❤ ve ~ Cobs. x
What a lovely comment, thanks for steering me in the right direction, perhaps next time Moo is over I can play with my stamps while he does some stamping made from potatoes LOL
Ahhh … that’s where Grandads old shirts come into play! They’re great at protecting the clothesies.
Grandad doesn’t always agree that *that* is an old shirt … but Grandest and I get away with murder because Grandad lubs us. 🙂 ~ C ❤bs
Thanks for the mention – I am chuffed! I wish something like this had been around when I was starting out. I still shy away from masking and making larger groups of flowers but am determined to give it a go soon. Your card is beautiful. xx
Hello! 🙂
‘The mention’ … I was going to drop a note on one of your posts, asking if you minded me quoting you and popping a link to your website within my post (the link is actually your Web Name – if you hover over your name in my post above, you’ll see that you can click the name and it will take you to your own blog (opens in a new page)… but the thought became the action and it wasn’t until I read your comment that I realised I hadn’t actually sent you a message to ask you about it! DOH! (as Homer would say)
Masking … it’s easy peasy. If you’ve got Post It notes it’s a doddle. I perhaps should have talked about this in the post. Hmm.. I’ll make another post sometime this week and do a couple of photo’s to help explain it. Once you see it you’ll lose those jitters about masking, and then groups of flowers will open up to you!
Thank you so much for the comment, and for your lovely words. I love to see your name pop up here, and it means so much that you actually share your time. Bless you.
l ❤ ve in bucket loads ~ Cobs. x
I’m such a dinosaur, when you said ‘Homer’ I thought ‘Odyssey’ before ‘Simpson’, even though I used it just yesterday myself! I’m OK with the technique of masking, it is the composition and the time it takes – which is why my cards tend to be quick and simple…
And of course I don’t mind you quoting me – I thought it was lovely of you!
Your “quick and simple” cards are totally Fabulous with a capital F! They have a kind of ‘signature’ style to them and I’d know they were yours if I was told to pick between (say) half a dozen cards. Your cards have an elegance and a delicate ‘look’ which you somehow bring to a card. They’re all beautiful PaperPuff, and your blog is such a delight to follow.
… Oh .. Homer! I’m chuckling to myself here because … (and you might not believe this but …) when I typed ‘Homer’ I instantly said, inside my mind, “she’s going to think ‘The Odyssey’ when she reads that … mmm … pft, she’s clever enough to know what I’m yacking about.”. How weird is that?! lol I’m obviously psychic. (Or is it psychotic? lol) 🙂 Sending hugs and a special afternoon squidge, l ❤ve ~ Cobs. x
Hello Artlit!
Aw so lovely to see you here. Thrilled that you liked the ‘Guide’ to stamping parts 1 & 2.
If you do give this a go, I would love to see your makes, so do please blog about them because I know they’ll be truly lovely. Thanks so much for popping along and sharing a coffee with me, such a joy! 🙂
l ❤ ve ~ Cobs. x


Goodness how brilliant, thank you once again for a little hand holding, your descriptions are very clear and precise, I now feel confident enough to take the first wobbly steps into the world of stamping ~ I can also foresee a highly necessary shopping trip on the horizon …you know … purely in means of research & broadening my horizons … who am I kidding I want / need pretty stamps LOL
LikeLiked by 1 person
Actually smiling big time about the shopping trip. Enjoy yourself … I’ll be on your shoulder cheering you on! (or should that be ‘egging you on’? lol) 🙂
Again .. if there’s anything I’ve forgotten to mention here, or you’ve seen something you need more details on, just ask away. I promise I’ll reply and help … and I also promise I won’t think you’re a pain in the ‘uknow’. I’m honoured and delighted to help.
Heaps of l ❤ ve ~ Cobs. x
LikeLiked by 1 person
What a lovely comment, thanks for steering me in the right direction, perhaps next time Moo is over I can play with my stamps while he does some stamping made from potatoes LOL
LikeLiked by 1 person
Plastic table cloth time, me thinks! 🙂
C ❤ bs x
LikeLiked by 1 person
And aprons LOL
LikeLike
Ahhh … that’s where Grandads old shirts come into play! They’re great at protecting the clothesies.
Grandad doesn’t always agree that *that* is an old shirt … but Grandest and I get away with murder because Grandad lubs us. 🙂
~ C ❤bs
LikeLike
Thanks for the mention – I am chuffed! I wish something like this had been around when I was starting out. I still shy away from masking and making larger groups of flowers but am determined to give it a go soon. Your card is beautiful. xx
LikeLiked by 1 person
Hello! 🙂
‘The mention’ … I was going to drop a note on one of your posts, asking if you minded me quoting you and popping a link to your website within my post (the link is actually your Web Name – if you hover over your name in my post above, you’ll see that you can click the name and it will take you to your own blog (opens in a new page)… but the thought became the action and it wasn’t until I read your comment that I realised I hadn’t actually sent you a message to ask you about it! DOH! (as Homer would say)
Masking … it’s easy peasy. If you’ve got Post It notes it’s a doddle. I perhaps should have talked about this in the post. Hmm.. I’ll make another post sometime this week and do a couple of photo’s to help explain it. Once you see it you’ll lose those jitters about masking, and then groups of flowers will open up to you!
Thank you so much for the comment, and for your lovely words. I love to see your name pop up here, and it means so much that you actually share your time. Bless you.
l ❤ ve in bucket loads ~ Cobs. x
LikeLiked by 1 person
I’m such a dinosaur, when you said ‘Homer’ I thought ‘Odyssey’ before ‘Simpson’, even though I used it just yesterday myself! I’m OK with the technique of masking, it is the composition and the time it takes – which is why my cards tend to be quick and simple…
And of course I don’t mind you quoting me – I thought it was lovely of you!
LikeLiked by 1 person
Your “quick and simple” cards are totally Fabulous with a capital F! They have a kind of ‘signature’ style to them and I’d know they were yours if I was told to pick between (say) half a dozen cards. Your cards have an elegance and a delicate ‘look’ which you somehow bring to a card. They’re all beautiful PaperPuff, and your blog is such a delight to follow.
… Oh .. Homer! I’m chuckling to myself here because … (and you might not believe this but …) when I typed ‘Homer’ I instantly said, inside my mind, “she’s going to think ‘The Odyssey’ when she reads that … mmm … pft, she’s clever enough to know what I’m yacking about.”. How weird is that?! lol I’m obviously psychic. (Or is it psychotic? lol) 🙂
Sending hugs and a special afternoon squidge, l ❤ve ~ Cobs. x
LikeLiked by 1 person
Thanks for the kind words. Always go with the more flattering option, so psychic it is!
LikeLiked by 1 person
This serious is one of my favourites! The end results are absolutely beautiful – I hope to do them justice when I try this out!
x
LikeLiked by 1 person
Hello Artlit!
Aw so lovely to see you here. Thrilled that you liked the ‘Guide’ to stamping parts 1 & 2.
If you do give this a go, I would love to see your makes, so do please blog about them because I know they’ll be truly lovely.
Thanks so much for popping along and sharing a coffee with me, such a joy! 🙂
l ❤ ve ~ Cobs. x
LikeLike