
I know that you can get very good texture pastes for crafting, but they come at a price. I’ve never before bothered about crafting with these texture pastes as it just didn’t feel like my cup of tea (so to speak), but recently I’ve had the urge to have a go. And so I did. Only .. not with crafters texture paste. A few days ago Mr. Cobs had to visit B&Q (other DIY outlets are available), and I asked him if he would get me some Polyfilla. After looking at me with a very suspicious head to the side and squinting his eyes look, I explained that I wanted to use it in crafting, on some cardstock, using some stencils, so I needed “the fine, ready mixed stuff please”.
Bless his heart, he didn’t just bring me back the required tube of Polyfilla, but also a special scrapery type tool to help me get a smooth ‘pass’ with the creamy Polyfilla.
I chose a stencil – a metal Jellyfish stencil by Dreamweaver – for my first ‘have a go’.

I have to admit that I did question as to whether I was being a bit over-ambitious, but I pushed that thought to the back of my mind and ploughed on with hope ever-present in my brave heart.
It was a little bit fiddly when I dragged the Polyfilla over the stencil as there were a few parts which just hadn’t ‘taken up’ the gungy stuff, so I got down and dirty and scooped some excess ‘filla off the scraper then promptly blobbed it back onto the scraper again in just the right place and dragged it carefully over the spots that had ‘missed’ first time round, and VOILA … the gaps were filled.
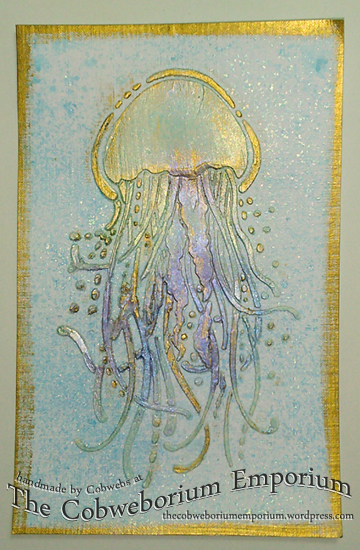
I wish that I hadn’t been quite so excited when I removed the stencil, for I would have taken a photograph of the piece at that point. Sadly my excitement dragged me on and I got busy with my mica powders. I used three different colours of Mica.
I’m kind of glad that I worked so quickly because the Polyfilla was REALLY quick to dry. It says on the tube that it will dry in around 60 minutes. But … this is a really thin coat which I applied to the card, and add to that: the card is porous, so it takes up the moisture in the ‘filla very quickly and so it dries faster.
The image was only just damp by the time I’d got the tops off my Micas and began to sprinkle and drop colours where I wanted them to be. I left this project alone then for half an hour – just to make sure, then took it outside and huffed and puffed the Mica off the card and onto the garden. (It now looks like a fairy has flown by out there. lol) I stood there in the garden with eyes as wide as saucers saying (quietly and gently) a long drawn out “Oooooooooooohhhhh!“.
Back to the craft room … I had an idea and wished that I’d have thought of it before I began: …
I’ve recently invested in some Lindy’s Stamp Gang products and wanted to spray the background with one of the Starburst sprays (in a blue colour called Azure Sea Asters). These are the most magical, incredible shimmery sprays, and each of them has a two toned colour to it. (I’ve only had these products for a short time but I’m so impressed with them. I also have some of their embossing powders and the colours are amazing!)
I’ve tried to capture the colours by changing camera angles but haven’t managed terribly well. This is another shot of the Jellyfish, with the flash on.

The products I used for creating the Jellyfish are shown below:

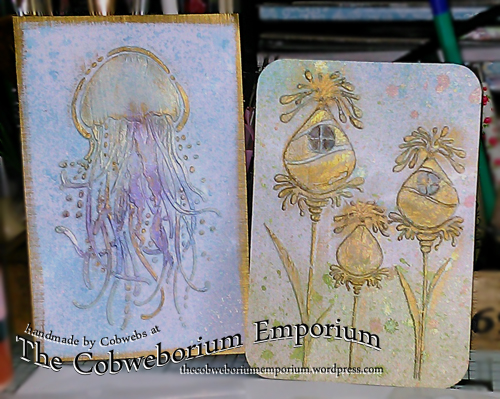
Filled with creative excitement I had to make something else with the Polyfilla ….

This time I planned it a little more carefully and used my Lindy’s Stamp Gang Starburst Sprays on my cardstock first. They don’t take long at all to dry and are delicate colours when dried.

Using a Sweet Poppy stencil, I got to work on my second ‘go’ with Polyfilla. This one was a little more tricky. There are some tight corners and slight space/gaps in the stencil which meant that the ‘filla had a job fitting through adequately to actually stick to the page. I did my best at filling the holes and gaps, but when I removed the stencil some of the Polyfilla came away with it. The spaces were so tight.
Undeterred I continued with my Mica Powders.
Once the Polyfilla was dry I used a grey and a dark brown very fine liner pens and carefully ‘drew’ in the shadows of this stencilled picture so that I could ‘add’ the details which were missing. Once this was done you didn’t notice that the filla wasn’t actually there.
The products used for this project are pictured below (minus the Mica Powders, which I forgot to include)

I’m not sure at the moment what I’m going to use these two projects for, maybe a card, maybe part of a scrapbook page… but when I’ve made what-ever it is, I’ll be sure to share it/them with you.
Oh … I forgot to say … I finished them both off with a little bit of Rub ‘n Buff in Gold. Just to bring a little zing to them and highlight them a little, and also to add a little bit of a ‘puff of magic’ to the tops of the seed heads.
Well that’s me done and dusted. If there’s anything I’ve forgotten to say or anything you need to know more about please just ask. I really don’t mind sharing information about anything crafty I’ve done.
I’ll leave you with the Jellyfish so that you can think of cool sea waters, lapping around you as you stand up to your shoulders in the most incredible blue sea water, with the heat of the sun playing around your shoulders. You turn to see a waiter standing on the water’s edge with a long cool drink on a tray, and you hear the tinkling of the ice on the glass. Oh, I forgot to say that you’re a beautiful size 6 or 8 (British size) and as you walk out of the sea, you’re dressed in that same bikini which Ursula Andress wore in the James Bond movie Dr. No – only you look even better because …. well .. because you do!
And now you’re in that wonderful state of relaxation and fantasy, I shall leave you with these words….
Have a wonderful and truly blessed rest of your day my friends. Sending love and creative hugs from me here in my corner of the world to you there in yours.


Greeting from the Antipodes Cobs. Although it is now officially Winter, south-east Queensland is bathed in glorious sunshine and has a predicted maximum temp of 28 degree C for tomorrow! So much better than the howling winds, grey skies and pelting rain we endured over the past weekend.
Your “play” with Polyfilla and the resulting cards were wonderful and caused me to think “textured cards” again, but in the meantime I hope you don’t mind that I reblogged your post on KenMaursCorner. I have been more than a little slack recently with blogging or indeed anything remotely creative, but you have enthused me again.
Enjoy your Summer
LikeLiked by 1 person
Hello Maureen!
How fabulous your weather sounds there right now. A real treat after the truly wintery weather you had last weekend.
I’m thrilled to bits that you liked the ‘Play with Polyfilla’ as much as you do, in fact enough to reblog it and share it on your own blog. That’s such a huge compliment. And … to know I’ve enthused you is a double plus. I hope you have a play yourself, and wake up that crafty mojo inside you. It sounds like that cheeky monkey has put it’s feet up and hibernating!
Thank you for the comment Maureen, and the re-blog.
Have a fabulous day, and I hope that wonderful weather lasts. ~ Cobs. x ❤
LikeLiked by 1 person
Reblogged this on KenMaursCorner and commented:
Do read this blog from Cobs! I hope to try out her method as soon as I can. Too long without play makes Maureen a very dull girl!
LikeLiked by 1 person
Lovely!
LikeLiked by 1 person
Hello Lucid Gypsy, and … many thanks for the comment and for taking the time to leave it. Thrilled you like it.
LikeLike
Ooh, these are fantastic and made with Polyfilla! The jellyfish is my absolute favourite as he is so shiny and tranquil – anything that makes me think of the sea will get me dreamy. Hope you are having a good day Cobs 🙂 Hannah xx
LikeLiked by 1 person
Hello Hannah!
I love it when I see your name here because it gives me an instant warm, fuzzy feeling inside, and an instant warm smile to my face.
Polyfilla … I know! I used this type of Polyfilla because it’s aparently more flexible – so this lead me to thinking that it would work on card and wouldn’t just crack off. I REALLY enjoyed my little self with it.
Thrilled to see you here, and a BIG THANKS for leaving me a message. You know how I love to chat! he he.
sending oodles of crafty hugs ~ Cobs. x ❤
LikeLiked by 2 people
How very creative of you! They both look amazing and I totally do the same thing, so eager to do, that I forget certain steps! These really are serene and captivating. They would both make a wonderful shadow box picture. Hugs Kim x
LikeLiked by 1 person
Hello Kim 🙂
I’m relieved to hear that I’m not the only one who ploughs on, filled with ‘make it’ vibes, and forgets to do step one before everything else! I guess we can either try to put it right, or take it as a message telling us that step one isn’t necessary.
Shadow Box pictures! Ohh wow, I never thought of that! I can see those in my head right now. Oooo, I’m going to have to make a choice. Meantime I’ve got the propped up against my ribbon storage, and I’m enjoying looking at them.
Thanks for the visit Kim, and for the lovely message. Bless you.
Sending love ~ Cobs. x ❤
LikeLike
All I can say is I’m straight off down the DIY shop.!! Your pieces are lovely. Hugs Mrs A.
LikeLiked by 2 people
Hello Mrs A. 🙂
Chuffed to bits that you like the pieces, and yes, please do have a go at this. It was a really enjoyable bit of fun.
I did forget to say .. You must wash your stencil and any other bits of equipment you’ve used which have got Polyfilla on them, straight away after you’ve finished using them – if you can’t get to the sink to give them a good old soapy wash, then pop them straight into a dish of water so that it doesn’t allow the ‘filla to set rock hard on your tools.
(perhaps an old ice cream carton filled deep enough with water or maybe a large enough pyrex type roaster dish so that everything is submerged under the water)
Do have a go.. I reckon you’ll love it and the results!
Thanks for the comment my crafty blogging friend. Have a truly fabulous craftaholic day! ~ Cobs. x
LikeLike
OMG love these, certainly don’t think Polyfilla when you see these. The colours are delicious ❤️
LikeLiked by 1 person
Hello Gail!
Aw lovely to see you, and I’m thrilled you like the Polyfilla pictures.
Thanks so much for your comment, it’s very much appreciated.
Sending love and crafty hugs ~ Cobs. xx
LikeLike
I’m going to try this! Thanks for the top tip.
LikeLiked by 1 person
You’re very welcome!
Let me know when you’ve had a go. I’d love to see what you made.
~ Cobs. x
LikeLiked by 1 person
Will do! 🙂
LikeLiked by 1 person
The most amazing results!
Like you, I’ve also found a trip to the D.I.Y. store can reap great rewards, that is where I bought chalk paint before I could get any from craft companies and also would snap up some lovely trims and metal chain, always worth a visit 🙂
The shimmer shows up so well and looks amazing on the jelly fish, bringing it to life.
Wishes
Lynne
LikeLiked by 1 person
Ohh yes! I know exactly what you mean Lynne.
Having been a crafter for more years than I care to admit, I too bought nearly all my crafty supplies from DIY stores. Paints in particular, and yes I too have bought chain from them and if they have it at the right price, I’ll still buy it now from them.
Thank you so much for your kind words about these two projects. They really are very much appreciated.
Squidges ~ Cobs. x
LikeLike